
BROCHURE
Advanced Techniques—BR10
©1996-2006 C.Williams/Rio Rondo
 To Reference Main Page
To Reference Main Page
To Reference Main Page
The information contained in this document is horribly out of date, in light of the new-production etchings we now carry. This document will be updated with new information as soon as we are able to get to it.
The most notable change is that you CAN use super-glue, rather than the other glues mentioned in this document, our favorite is "Aleene's Jewelry & Metal Glue", which is a super glue gel. Allow super glue to dry overnight for best long-term adhesion.
—8/1/2018
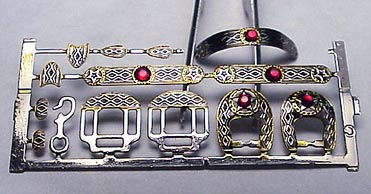
Items shown above have been Antiqued, Colorized with gold, Sealed, formed, the buckles Domed and Crystals added.
Version 1.1 7/19/2018
Please note this document is currently a work in progress and will be added to/amended for a time
As of this version, you will need to use your best judgement until we're able to test more parts
There are quite a few things you can do, that will add more variety, color and dimension to Rio Rondo's etched plates. Please note that the various procedures outlined below, need to be performed in a specific order in reference to each other as well as with the Basic Procedures.
Depending on the type of plate and tack items you will be working with, you may need to vary the order of the steps.
The simplest thing to do to enhance the look of these plates, is to add a little antiquing or "blackening" effect to them.
For this you will need the following:
Be sure that you have saved your "frames" the parts came in! They are very handy for testing colors, and practicing.
Within this document, "Antiquing" will refer to the process of adding color to the low areas of the design.
Typically, "Antiquing" is going to be done with black color. However, you may wish to experiment with other colors. For hours of amusement, I'd suggest investing in Sharpie's large package of 29 colors with "Ultra-Fine" tips for use both in Antiquing and "Colorizing" (We found ours at both Hobby Lobby and Staples.) Keep a fat black marker around for general blackening.
This procedure should be performed after Step 1 of the Basics.
Individual larger items such as Corner Plates can be antiqued individually after Step 3 of the Basics, if you prefer.
PLATES MUST BE ANTIQUED PRIOR TO STEP 4 of the Basic Instructions.
Place the folded up copier papers together on top of your clean, flat, work surface. You may wish to place a couple sheets of newspaper over your work surface to prevent staining or marking it up.
Use the marker to apply color to the entire decorated surface of the plate(s) to be antiqued. Allow the ink to dry about 5 minutes.
It is best if small parts remain attached to their frame. It is also easier to work with if the frame is cut into smaller segments about 1" or so wide.
Note: Marks-A-Lot markers will lay down a thicker more opaque black color than Sharpie... however it will be a bit more difficult to buff the extra color off.
Place the plate (or segment) blackened side down on top of the paper. Press the plates down with your fingers, using some pressure and rub the top surface back and forth across the paper. This will begin to remove the ink color off of the high spots of the plates.
Turn the piece over and check it as you go. Continue to rub the top surface on the paper until the desired amount of ink is removed. You may need to press down harder on some areas than others.
If the Ink coverage does not seem to be quite enough, or seems to be missing or light in a few spots, you can re-ink the plate and try again.
If you do not like the effects, or wish to experiment with different colors, simply dip the tip of a cotton swab in Nail Polish Remover (or acetone) and swipe all the ink off the parts. You may need to use several cotton swabs to remove all of the ink. Blot the parts on a paper towel if needed, before starting again.
You can very lightly buff the top surface with a piece lens paper, to carefully remove more ink and reveal better detail. The results of this will depend on the exact design and depth of the decoration. If you find you have removed too much antiquing color, simply re-ink the plate or the affected area, and try again. Regular bath tissue can work in a pinch, but will tend to leave lint that will need to be removed.
You can selectively remove a little more color from some areas with the tip of a toothpick dipped in nail polish remover or acetone. Before starting, "chew up" the tip just a bit so it is a little "fuzzy" (or sand the end slightly). Do this before dipping it into any solvent. Use the tip to carefully remove ink from tiny areas to obtain different looks or effects.
NOTE: This is a rather tricky operation... and takes some fine control and luck to do successfully and consistently, especially on the smaller parts. If you mess up, simply re-ink the plate and begin again.
You can also apply multiple colors in different areas of the plate for differing effects. Please note however, that colors may "bleed" into one another, so some practice may be required.
At this point, the Antiquing procedure is complete and your plates are ready for Sealing--please review the instructions below.
Once the plates are sealed, you can also add other special effects to them, or you are ready to complete all the remaining basic steps each plate will need, and glue the plates into place.
All plates that have color added must be sealed in order to preserve the coloring so it will not rub off later.
If you plan to Colorize the plates (add color to the high spots), they will require two sealings... one before you add the color so it will not bleed, and a second coating to seal the color in.
Plates must be sealed BEFORE they are glued onto the tack item or used in the assembly process. Step 5 of the Basic Instructions.
Notes About Sealing:
Hot glue can be used before and/or after sealing with no ill effects.
Plates can be domed, formed and shaped even after they have had sealant applied.
Plates MUST be allowed to thoroughly "dry" or "cure" before performing any further steps.
To apply sealant to your plates you will need:
Cover your work area with newspapers to protect it, and place the desk lamp on your work area. The lamp will be used to "warm" the parts and assist in curing the sealant.
Place the parts on the sticky side of the Masking tape to hold them in place. Make sure they are firmly pressed down.
Place some strips from the frame of the parts on the tape as well. You can use this frame piece to check for dryness later, and it will come in handy for other testing.
Lightly wipe any fingerprints or anything else from the surface of the plates with lenst paper. You can use bath tissue, but use only tissue that does not have any lotion in it.
Place the tape with the parts on it under the lamp. Turn the lamp on and allow the parts to warm for about 5 minutes.
Read all label instructions and cautions on the can of sealant. Shake the can vigorously for 2-3 minutes.
Put on the gloves to protect your hands.
Pick up the tape strip with parts on it in one hand, and the can in the other and
Spray the can into the open air, AWAY FROM YOUR PARTS pointing the nozzle DOWNWIND to get the flow started.
Holding the can about 12" away from the tape, spray the parts in one even stroke from top to bottom. Spray only enough to just barely coat the parts to an even gloss... do not spray so much that the sealant runs or sags! Do not spray so little that you don't achieve an even coverage.
Turn the can upside down, and with the nozzle pointed away from you, spray the can until no more sealant comes out.
Wave the tape in the air for a minute so most of the solvent in the sealant evaporates before going back indoors.
Place the strip of tape with your parts on it back under the lamp and allow them to sit for about 20-30 minutes if you are doing a first sealing.
DO NOT GET IN A HURRY! If the sealant is not firmly set, you can easily gouge it and leave fingerprints and stains and will have to begin again.
Check the "test" strip of frame for any "tackiness". When it is adequately dry to the touch to handle, your parts are ready for colorizing.
If you are sealing a part that needs to be formed (such as a noseband), allow the parts to dry about 2 hours under the lamp, before attempting to form the part.
When all procedures for the plates are completed and any additional decoration and coloring is added, your plates will require a second coating of sealant. Follow steps A, B and C again.
NOTES
Sealant can be applied over any crystals that have been added, without dulling their shine or sparkle. (Alternatively, crystals can be added after the final sealing has been completed, if you prefer.)
If you find some sealant has seeped under the parts, this can be easily removed by placing the part on sandpaper (320 grit, wet-or-dry) and rubbing the backside around until the back is level again.
Label recommendations are to allow the sealant to dry or cure for 72 hours before putting the item to use. For model horse tack, I would recommend waiting 72 hours before attempting to package the tack up in a bag or other packing material and shipping it. This is to avoid the possibility of things becoming embedded in the sealant.
Leave a lamp on the parts for the first hour or two, after that, set the parts aside in a safe place (preferably warm if you can do so) and allow the parts to finish curing.
You can attach the parts to your tack about 1-2 hours after the final sealant is applied. After that, leave the tack in a safe place to allow them to completely cure, before wrapping them up for storage or shipment.
Hopefully, this will not be necessary! But if for some reason you need to strip the plates and start over, you'll need this information.
Find a small glass or stainless steel container and pour a small amount (about 1/2" deep) of Lacquer Thinner in it.
Drop the plates into the container and allow them to soak for 1-2 hours. Use tweezers to remove the parts from the thinner and blot them on paper towels. Use a tissue to remove any remaining sealant, coloring etc.
Allow the parts to dry for 30 minutes or so.
If you need to also remove any glued on items, you will need to heat the glue and remove the parts that way (as noted in the sections on Stacking and Adding Crystals).
Now you should be ready to start again.
Please note that it is very difficult to adequately antique plates after they have been stacked and/or formed.
Additional notes:
You only need to use Sealant, if you are applying antiquing or colorization to the plates. If you are simply going to use the plates as is, or are using only doming, stacking or crystals, the plates will not need a sealant (although, you can apply sealant if you wish.)
The various procedures can take a bit of time to perform overall, especially across an entire set of plates for a coordinated tack set. You can choose to do a few plates at a time, or perform each step for all the parts as you go.
Take your time! Don't be in a big hurry to assemble your items immediately if your plates require sealant! Be patient, and allow the plates enough time to adequately cure.
Doming is a procedure to help add a little more depth and dimension to the plates. Please note that we are in the process of locating tools that you will need to do this effectively... and will add that info here as soon as we have it.
Most notably, conchos, as well as buckles can benefit greatly from being domed a bit. However, doming can be a very tricky operation, and takes some practice. Be prepared to "wreck" a few parts learning how!
For the Doming procedure you will need:
The small ball stylus is useful for doming out small conchos, buckles or areas of a plate that have a small concho shape within them.
*We have found that a small carriage bolt with a rounded top works fairly well for plates 1/4" and larger. We looked for one with a smooth cap (many of them have raised lettering or other marks on them). If you can't find a smooth-topped bolt, you can use a grinding wheel on a dremel, or some wet-or-dry sandpaper to smooth it out and shape the surface. While there are professionally-made tools just for this purpose, they tend to be quite pricey.
This procedure should be performed after Antiquing and Sealing as shown above.
In most cases, parts should be removed from the frame, and trimmed (Basic Step 3).
Place the part decorated side down on the soft wood block.
Place the rounded end of your doming tool firmly on the back center of the area to be domed. Rap the handle of the tool with a mallet firmly.
To "dome out" a round concho shape within a plate (such as a halter plate) one good tap should do it (using the ball stylus).
To dome out a round or oval concho, may take several good raps. You will need to move or "walk" the doming tool around the back of the plate a little bit to get the right look. Err on the side of caution here, and keep the taps light. Too many hard taps will deform and "pockmark" the part.
Large Conchos or areas to be domed can be very tricky (areas over 1/4" diameter). Use a large domed object (the head of a smoothed carriage bolt) for these items. Alternatively, you can "walk" a smaller tool around the back of a plate.
CAUTION! The problem with doming large things or tapping the plate multiple times is that it can cause the surface to become uneven or even pock-marked. Also, the surface design will flatten and become soft and less distinct with more taps. The idea is to get the amount of doming you desire in as few accurately placed taps as possible. This will take some practice, and on larger plates, please be prepared to ruin a few items.
For Buckles, two or three average raps across the large wide area at the buckle's top generally will do the trick nicely and give the buckle a little curve and dimension.
Depending on the size of your larger doming tool, one good rap over the entire back of the buckle may produced good results.
You can also use any small tool (such as the tip of a stylus) to tap down the tongue bar from the front side, to "depress" it a bit, so the leather tab attached there will not "stick up" so far from the front of the buckle after assembly. Be careful-- it is possible to "overwork" a part and severely mash it or break it.
After doming, some parts may need to be "leveled" a bit so its edges will lie flat and even. (This is particulary true if you will be stacking the domed plate on top of another plate.)
Place the part on a hard and flat surface, and using a wooden or rawhide mallet (not a metal hammer!) lightly tap the surface once or twice. You can place a piece of paper over the part to help protect the surface. Check to see if the edges are level or nearly so. Repeat if necessary.
Doming is perhaps the trickiest operation to perform and may not always work as desired. So be prepared to make some errors and even ruin a few parts learning how!
This procedure will add quite a bit of design flexibility to all of your tack items and is fairly simple to accomplish. It consists of simply gluing one plate on top of another... for example, the concho of your choice can be added to your favorite corner plate to add depth, dimension and produce an entirely new look.
It does take some planning to set up stacked plates... to decide which decorative options will be used, and what order to perform them in.
Stacking should be done AFTER any Antiquing , Sealing and/or Doming.
In addition, for plates that will need some type of forming under the area where the plates are stacked, you should form both parts at the same time (both base plate and added plate on top) before gluing them together.
This would be most common if you wished to stack a concho on a noseband plate or browband or stacking a concho on top of a buckle. In most cases, corner plates can be stacked first, and then formed.
When in doubt, form first and stack later.
For this step, the term "plates" will refer either to both items to be stacked together or to the "base plate" or your main plate that will be on the bottom (such as a corner plate). The term "concho" will be used to denote the item to be stacked onto the top to add decoration.
For the Stacking procedure you will need:
NOTE: We found we preferred using 2-Part Epoxy for stacking plates, as the glue would hold the plates together nicely, when we went to attach the plates to leather items with the hot glue.
It is important if you are going to use epoxy, that any notable forming of the plates to be stacked should be done at this time, so the plates are stacked together in their "formed" shape, and will not need to be adjusted much for the final attachment. This will keep the plates from potentially separating from each other from the bending.
Place the base plates (those that will have other parts added to the top of them) on the sticky side of a piece of tape, decorated side up, to keep them from moving around.
Check for appropriate fit and location of added conchos/plates to "eyeball" them to achieve the look you desire.
If you intend to use a 2-part liquid epoxy, skip to Step D.
Heat up your glue gun, and have your knife, tweezers and toothpicks handy.
Pick up a concho (or other part to be placed on top) with your tweezers and have it ready.
Apply a tiny dab of hot glue to the bottom plate, in the center of the area where the concho (or other item) will be added. (Alternatively, you can place a tiny dab of glue to the underside of the concho, then add that to the base plate instead)
Put down the glue gun quickly, and place the concho on top of the dab of glue. Press down on the top of the concho firmly with either your tweezers or a toothpick. Nudge the part to adjust its location if necessary.
For very small conchos, squeeze out just a little bead of glue from the glue-gun's tip. Use a toothpick to pick up a wee bit of glue, and touch it to the bottom of the small concho. Then place the concho about where you want it on the base plate and go to the next step. (Applying a small amount of glue to the concho will help prevent using far too much glue and creating a bigger mess on the base plate.)
If the concho on top is not placed correctly, you can gently "re-heat" the area.
Have some paper towels or tissues handy to wipe off any glue from the side of the glue tip first.
Touch the SIDE of the heated tip of the glue-gun area right to the added concho to re-warm the glue. Don't touch the top of the plate/concho with the glue-gun's tip to avoid getting glue on the plates.
Alternatively, pick up the plate with tweezers, and warm it with the side of the gun's tip, from the bottom side of the plate.
Wait a moment while the hot tip re-heats the metal, and the glue softens.
Use the tip of your tweezers or a toothpick to nudge the top concho to where it should be.
If there is too much glue pushing out from around the edges of the concho, while the glue is still warm, you can use the tip of a toothpick or the tip of your hobby blade to gently "peel" out the excess glue. This will take a little patience. If all else fails, heat the parts enough to remove the concho-- remove some of the warm glue with toothpick or knife, then start again.
Once the glue has cooled, you should have an excellent and strong attachment.
Skip this step if you're using hot glue!
Hot glue has a disadvantage with small parts in that it is hard to get a tiny amount of glue on a tiny part, and keep it warmed up and prevent "stringing". You may find stacking plates with a standard 2-part Epoxy is easier and less hassle.
We used Loc-Tite 3-Minute Epoxy. It is clear and worked very well. We also tried an old standby "JB Weld", which is silver/grey color. JB Weld does take longer to cure (overnight is best) but it has the advantage of being visible. If you use a tiny amount... you can see where you have placed the epoxy easily. Of course, you can just as easily see it if it gets put in the wrong place or smeared!
Squeeze out a little of both A and B parts into two separate little puddles onto a folded up piece of paper, or a metal lid etc. (Any object that can be thrown away).
Using one toothpick each for parts A and B, scoop up a little of each A and B parts; try to keep the amount of each even, and put them into a small "pool" together and mix with the tip of a toothpick. When the epoxy is well-mixed, wipe the excess from the tip of the pick with a tissue.
The amount of epoxy you will need to glue down each concho plate, will depend on the plate's size. A tiny dab is all that is needed for very small conchos, while a small "pile" to fill in the gaps will be needed for a larger domed concho.
Use the tip of the toothpick to scoop up a small amount of epoxy and place it in the middle of the spot on the base plate where you will attach the concho. If you are attaching a large domed concho (1/4" or so) apply the epoxy into the depressed area on the back of the concho instead, while holding the concho with tweezers.
Grasp the concho with your tweezers, and carefully place it where desired onto the base plate. If any epoxy has gotten onto your tweezers, after releasing the concho, wipe the tweezers clean with a tissue.
Use the tip of your tweezers, or a clean toothpick to gently press the concho into the epoxy, and to shift the plate into the desired position. Since the epoxy does not begin to really cure immediately, you should have plenty of time to get the concho placed accurately.
Use the tip of a toothpick or hobby knife blade to remove any excess epoxy that may ooze out from under the concho. Be sure to wipe the epoxy off your tools as you go.
Once the mixed epoxy starts to get "gummy", just mix up a new little batch for further attachments, rather than fighting the gummy epoxy.BR>
Allow the epoxy to set the minimum amount of time recommended on the packaging, and add a few minutes (especially when temperatures are cool). You can place the parts under a lamp to keep them warm during the curing process.
NOTES: Hot glue (and epoxy) can be applied over or under sealant. It will hold acceptably either way.
DO NOT use "Super Glue" for stacking plates. It will not hold acceptably well.
DO NOT use epoxy putty for sculpting instead of a standard 2-part liquid epoxy. It will not work for this use.
Once the epoxy is fully set (or your hot glue fully cooled) you are done with this step!
This procedure should be done after any Antiquing and/or Doming has been completed.
ALL PARTS TO BE COLORIZED MUST BE SEALED FIRST!
The sealant provides a "base" for the ink to soak in. Without it, it will rub off easily with the barest amount of handling, and if multiple colors are used, they will bleed into each other easily.
Please note that colorized parts also require a second coat of sealant over the top, to seal in the color.
For the Colorizing procedure you will need:
Most Sharpie/Mark-It markers are delightfully translucent, allowing you to colorize an area, and yet still have the sparkle and shine of the metal show through. Some colors cover better than others.
We recommend the "jumbo" set of Sharpie markers, featuring 29 colors, for tons of fun.
To initially test colors and practice, you will need to do this on an UNSEALED item. You can use a cotton swab and nail polish remover (or acetone) to remove any color as you go to test your ideas.
Pieces of the frame, or the back-side of extra plates (or front side of unused plates) can all be used to experiment. When you are done, simply swipe off the ink with a cotton swab and solvent.
DO NOT "TEST" COLORS ON SEALED PLATES. The sealant will absorb the ink, and you will not be able to remove all of the color without removing the sealant! However, you can go ahead and "seal" scraps from the frame, to mess around with. Keep in mind, by the time you get to this colorizing step, you've probably invested a lot of time in preparing your parts, so be sure to test your ideas and check your colors on other parts or frame pieces first!
Some of our favorite colors (from the "Jumbo" Sharpie marker set of 29 colors):
Place the parts decorated side UP on the sticky side of the tape to hold them in place as you work.
Apply the desired color to the areas of the plate that you wish. The color will seep into the sealant, and not "bleed" very easily.
Do not "overwork" the part coloring it. Apply it carefully, and in one pass where possible.
For tiny areas, use the barest touch to the surface, and work outwards as needed.
Keep in mind that the color will soak into the sealant. If you really mess up, it may not be possible to fully remove all the color, without also removing the sealant. Some of the color can be rubbed off with your fingertip immediately if you must... and some colors will come off well enough not to be noticeable. Some colors are very difficult or impossible to remove, even if you try to remove them immediately.
Handle the parts gently. Most of the more intense colors will hold up to light handling as needed as you work, but be careful. Check to be sure color has not rubbed off, and if it has, add more coloring.
Take your time, have patience and don't rush!
Allow the ink to dry for 5-10 minutes
See the instructions for applying sealant above. Allow the parts to cure well before further handling or assembling.
Be sure to include a piece of the frame when applying the final coat of sealant, so you can use it to check the curing of the sealant.
This step should be performed after all other optional procedures have been completed and any sealant has cured.
In this section, the term "Crystal" will refer to Swarovski, Austrian or Czech crystals (generally lead-glass). "Rhinestones" will refer to plastic simulated gems. "Stone" will refer to genuine natural stone cabochons or faceted gems.
We recommend Swarovski, Austrian or Czech crystals for best appearance and also they will hold up very well to the heat from a glue gun. Genuine stones of other types (turquoise, tiger eye, etc) may also be used. Cheaper plastic rhinestones can be used, but will not hold up to high temperatures of the glue-gun (and will melt in some circumstances). Plastic rhinestones should be attached with epoxy or super glue. Rhinestones that are usef for fingernail art can also be used.
NOTE: After all of our experiments, we find we much prefer to attach crystals with epoxy, since it is far easier to control the amount of glue and easier to adjust the positioning of the crystal. Also, if hot glue has been used to stack plates together, it is the best choice to prevent wrecking and undoing the parts.
Don't let the "wait time" to let the epoxy cure put you off... it really does work best for this purpose.
For Attaching Crystals, Stones or Rhinestones with Epoxy you will need:
For Attaching Crystals with Hot Glue (or Iron-On Crystals) you will need:
The "Iron-On" variety of crystals are handy because you won't need to mess with applying the hot glue (they are already pre-coated with hot glue). However, they do cost more than standard crystals.
Plastic rhinestones can be used, however they don't sparkle nearly as nicely as lead crystals. Plastic rhinestones should be attached with epoxy.
Many natural stones can also be used, such as turquoise, tiger eye or whatever you can find. To avoid cracking genuine stones with applied heat, we recommend attaching them with epoxy.
Place the parts decorated side UP on the sticky side of the tape. This will hold them in place as you work.
Select the crystals you will be using and check them against the plate for desired size and location.
If you will be using hot glue, heat up your glue gun (and possibly a soldering iron or stone-setting tool) and have your tweezers handy
If you will be using Epoxy have your epoxy ready to mix as outlined in Stacking—Step D above.
If you are using "Iron-On" crystals, you can skip to Step C, below.
If you are using epoxy, skip to Step D.
Apply a TINY dab of glue to the center of the back of the crystal. Use the least amount of glue possible to avoid having too much glue squish out from around the edges. For very small stones, you will need to scoop a bit of hot glue from the tip of the gun, onto a toothpick, and quickly apply the glue to the crystal with the toothpick.
Quickly, use your tweezers to place the crystal onto the plate and press it down. If the glue has already cooled, you can warm it by holding the side of the glue gun to the top of the crystal. Wait a moment until the glue melts and you can nudge the crystal into position. Alternatively, you can use the tip of a soldering iron or a stone setting tool tip to heat the crystal (and warm the glue).
Allow the plate to cool. Skip Step C and D.
Place the crystal on the plate in the location you want it to be with tweezers.
Use a stone-setting iron (or the side of your glue-gun tip or the tip of a soldering iron) and touch it to the crystal until the glue softens. Press the crystal down into place. Use tweezers or a toothpick to nudge the crystal into position. Rewarm the crystal as necessary to adjust the position of the crystal.
Skip Step D
Prepare the epoxy as in Stacking-Step D above.
With the tip of a toothpick, place a tiny dab of epoxy on the plate where the crystal will be placed. Using tweezers, place the crystal, and lightly push it down. Nudge the crystal into place with the tip of the tweezers, or toothpick.
Place all your crystals and allow the epoxy to set the recommended time. Placing the plates under a lamp to keep them warm will help assist the curing process. Even with the 3 and 5-minute epoxies, it is best to wait about a half hour before using them in tack assembly.
If for some reason, you had forgotten to seal the plates, sealant can be applied right over the crystals, and will not alter or reduce the gloss and sparkle.
If necessary, crystals can be carefully added to existing plates that are already attached to your tack items, using epoxy.
NOTE:
With very tiny parts, such as strap tips, keeper covers etc., it is easier to add special decorating while the parts are still attached to their frame. At some point these parts will need to be removed from the frame and the edges cleaned up. We recommend that you do as much work as you can before removing the parts from the frame. Once you get to the stage of removing the burs, the parts can be placed on tape and given a final sealant coating that will seal in those edges.
Once you have completed all your decorating steps, you can proceed to any remaining steps of the Basic Instructions.