|
Resin Stirrups
|
 To Stirrups Main Page
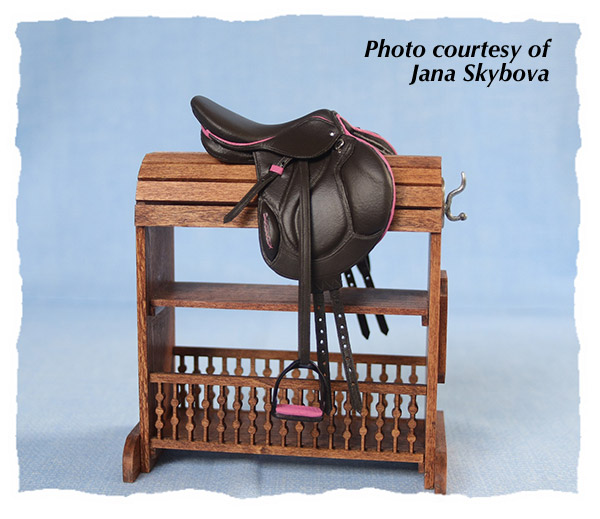
Realistic scale miniature resin stirrups are easy to spray paint. This tutorial will cover spray painting tips for any of our resin stirrups. Stirrups can be painted to look metallic silver, matte black or appear to represent other popular colors or materials.
All stirrups are sold by the pair.

Prep The Parts
The stirrups can be a little bit fragile, so be mindful when working with them.
Using 400 grit sandpaper, you can sand off/smooth out printing artifacts around the edges of the parts. These small ridges may not be visible on unpainted parts, but they really can show up once they are painted. These ridges are not very big, and you might not care... so it's up to you.
Carefully dust off the parts, and rinse in water to remove all loose particles. Make sure the parts are completely dry before spray painting them.
Prepare the Fixtures
Painting fixtures are just something you use to hold the objects while you spray paint them.
In this case, our "quick and dirty" method was to use two beading wires, wrapped around a long screw.
A screw was used so that the wires don't slide around which keeps the items from banging into each other when they are wet with paint. You can use a pencil, wooden dowel or whatever... just make sure the wires will not slide around.
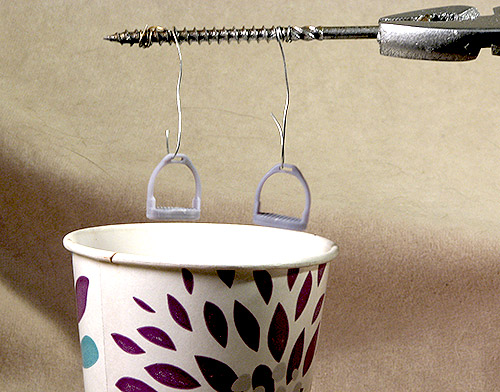
You'll also need a place to put the fixture while the items are drying. In this case we used a standard paper cup (6-8 oz size) and the 2 stirrups nicely fit in the cup with the screw sitting on top.
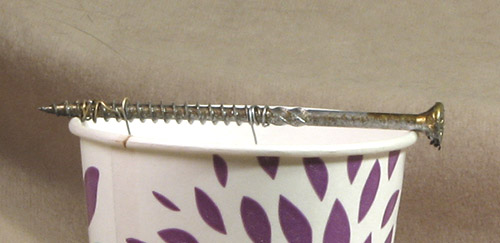
You can set up a long dowel with a lot of wires and mass paint a lot of stirrups at once, if you wish.
Make sure you have a place to put your fixture to allow the parts to dry! (Especially for larger/longer fixtures with more items.) Best to do this before you start painting as it may not be easy to find a spot one-handed with dangling wet stirrups!
It is best to do your stirrup painting ahead of time (before you need them for your tack project!) so that they're done and ready to go when you are.
Set Up Your Items
Hang your items on the wires. Make sure they don't "swing" too much, nor are held tightly (where the wire may leave an obvious mark.)
Space them out so when you move/rotate the fixture around, the parts don't bang into each other.
Prepare to Spray
Use latex/vinyl gloves to hold the fixture.
If using a tool such as Pliers to hold the fixture, put a plastic sandwich bag over the end of the pliers, and then grip the fixture with the pliers (through the bag.) This will keep paint off your pliers. It also can work for your hand in a pinch if you don't have gloves.
Do your spraying OUTDOORS. It's better for you and less messy in the house. Best to go out into the yard, as fallout particles can stick to decks, porches etc. Stay away from exterior house walls or you'll have metallic spots on your bricks, like I do.
Follow the label directions on your can of spray paint. Usually this means to shake it up A LOT before you start.
If you will be using primer... paint the parts with primer first.
Spray The Parts
Spray on a day it's not windy, and direct the spray downwind, while pointing away from the house, outdoor furniture, the deck and the dogs.
Spray a light even coat, then move/rotate the fixture to get the other side, the top and the bottom.
Light spritzes are best, as it doesn't take much to cause a drip. Does not have to be perfect the first round.
Allow the paint to dry well. Some metallic spray paints can take a lot more time to dry than you might expect. Put the fixture in a warm, safe place where it won't be disturbed. Wait at least an hour, maybe overnight. If it is not dry and you touch it, the paint will be marred and you get to start over!
You can do 1-2 light coats of primer, and then 1-2 light coats of metallic. If you don't plan on using primer, then 1-2 light coats of metallic paint should do it. Just enough to cover.
If you try to "build up" the paint to help fill in any print artifacts/ridges... it probably is not the best plan. It is far too easy to overload the paint and cause a drip, and it can take a couple of days to dry.
Oops, I Goofed Up! Now What?
This doesn't have to be a big problem. There are two ways to fix things:
1. When the parts are fully dry, you can sand off any rough or marred areas, and repaint the item. You might find a speck of dust, the items might have accidentally touched something and got a ding. You might even find that you prefer the printing ridges not to show. Either way, you can go back in and sand these things out, whether the item is coated with primer or paint.
2. Remove the paint. Find a little glass jar and pour some acetone in it. Drop the parts in and swish them around. If the paint is fairly fresh, it should take very little time to dissolve the spray paint off. Use a beat-up paintbrush to coax the paint out of the corners if you wish. Let the parts dry on a paper towel, and try again.
LET THEM DRY!
Let the finished parts dry as long as you can stand it. Overnight at least. If the paint layers got heavy, give the parts even more time.
Adding Hand-Painted Details
Once your parts are painted metallic (or black or whatever) and you are satisfied with their "base color", you can add hand-painted details.
You can paint over the treads a different color with acrylic paint and a small paintbrush. It may take a few layers and you'll need a steady hand.
If the spray paint on your stirrups is SUPER dry... you can use a piece of scotch tape as a painting "mask" to help paint straight lines along the edges of the stirrup treads. Don't leave the tape on any longer than needed to get the work done.
If you goof a little, you can gently remove excess acrylic paint with some isopropyl (rubbing) alcohol and a small brush. The alcohol will not readily dissolve properly dried spray paint.
Not all stirrups have, or need hand-painted details in a different color, so this step can be skipped depending on what you want.
Clearcoat
Clearcoat will help protect the surface of your painted stirrups from being easily dinged or marred later. It is especially useful to help seal in acrylic details.
Put the stirrups back onto the painting fixture, and prepare a place for the fixture to rest while things dry. Use gloves (or plastic bags) to protect your hands and any gripping tool.
Spray a light even coat over all the surfaces. Two light coats are better than one heavy one. Follow label instructions regarding re-coating and multiple layers.
LET THEM DRY SOME MORE!
Let the stirrups fully dry before handling them. It may be possible after a short time to remove them from the fixtures... but then they should be set aside (stood up, if possible) and left to sit a day or so, to fully harden.
It really can seem like a lot of "hassle" to paint small items like these, but the trick is to be prepared for the steps ahead of time, and take advantage of doing larger numbers of them if you can.
Each step of the spraying doesn't take much time... you'll spend far more time waiting for things to dry. Haste makes waste in this case, so be patient.
Good Luck!