This instruction sheet will show you how to simply and easily create a silver-laced "rope-edge"appearance to miniature tack items.
Genuine sterling silver stripping can be used (Rio Rondo part #SSL2) as well as narrow (approx 1/16") strips cut from the bottom of an aluminum pie plate.
SADDLE SKIRTING, CANTLES AND FENDERS
Complete all tooling, dying and finishing of the individual parts to be laced first.
- Lay the part grain side up (shiny/finished) on a cutting board or other protective surface.
- With the tip of an x-acto knife, determine a starting/ending point and pierce a line of slits parallel to the edge. These slits should be approximately 1/16"from the edge of the leather, a bit less on small-scale objects. Be careful not to get too close to the edge, or the blade may slice across it, or the lace may pull through. Too far from the edge will not create the desired effect. Experiment and Experiment and practice on a piece of scrap leather if you need to.
- The slits should not join one another, but should be about 1/32 to 1/16" apart, and in line with each other. Be sure the knife cuts through the leather. If not, go back and repierce the holes carefully.
- Measure the amount of silver lacing you will need. Lengths longer than 10" are difficult to work with as they tend to twist and kink. If more than 10"is needed, divide the work into two or more sections, and do one at a time. Add an inch to the length of each piece so you will have a bit of a "tail" to work with.
- Cut one end of the lace into a taper with a pair of scissors. Beginning at your starting point, thread the tapered end through the first slit from the grain (front) side. Pull the lace through until only a tail about 1/2" long is left. Fold the tail under the edge and hold it with your finger as you continue. (Hold the tail in place until you've done two or three "loops", then it will stay in place on its own.)
- While holding the tail, pull the stripping through until it's fairly snug. Bring the end around and thread it through the next slit (from the front) and tighten. Be sure that the stripping is lying flat, not twisted or kinked.

(Kinks that develop along the strip can be flattened with your fingers or the flat portion of the jaws on a pair of pliers.) Pull each loop or 'bight"snug enough to "pull"the leather slightly, but not so tight as to cause the leather to seriously warp, create a big open gap or pull through the leather. Continue to lace through each slit, around and around.
- When the last bight or loop is completed, snip off all but the last 1/2"of remaining stripping, and fold the tail under. Tails can be secured later by gluing a small piece of thin leather over them on the back side. (In the case of breastcollars and lower skirting on saddles, adding the liner, chamois or "sheepskin" to the underside of the piece will both secure the tails and prevent the possibility of the edges of the lace scratching a model. )
- If you have two shorter strips to lace a large area, splices can be made by simply folding the end tail of the first piece under, and parallel to the slits. Then, begin lacing the next piece and make sure that the first couple of bights wrap over the end tail of the first piece, effectively securing it.
NOTE!!
Take your time! I takes a little practice to learn to make the slits even, and keep an even tension when lacing, but it doesn't take long!
GULLETS, SHOULDER EDGE SEAMS, STIRRUP EDGES
—Silver Wrapping Technique—
First assemble and finish the piece before applying the wrapping. It should be noted that this wrapping method is only suitable for "stable"areas that are unlikely to be flexed or bent.
- Take a piece of leather lace (or strip of leather) that will closely match (or intentionally contrast) the color of the item you are adding a rope-edge to. The strip should be no more than 1/16" wide. (1/8 or 3/32" lace split in half lengthwise works well.) The strip of leather should be about an inch longer than you will actually need, and even longer is better to give you more to hold onto as you work.
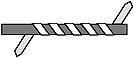
- With a piece of silver lace, wrap the strip in a spiral manner down the length of the leather strip. Wrap only the center section of the leather, using the ends as "handles" for your fingers.
- When you have wrapped enough leather for the length you need, arrange the piece over the area it is to decorate.
Trim the wrapped strip to size, and bend it as needed to conform to the shape of the item.
- Apply a bead of super-glue along the area the wrapping will cover. Be careful not to use too much glue or let it stray where it doesn't belong. Press the wrapped leather into place. Very long or tricky areas (such as around the edge of a stirrup) can be secured a small segment at a time, allowing the glue to dry before proceeding. Snip off any excess length after the glue is dry.
SPECIAL NOTES:
For smaller items or a more refined appearance, the silver stripping can be split or cut narrower and use as "half-width". This can work well for classic scale items and any place where you desire finer detailing.
If you will be using wrapping for several areas, you can make one long wrapped strip of lace, and cut the needed lengths from it one by one as you add them.
ADDING LACE TO FLEXIBLE ITEMS
A laced center strip can be added to a breastcollar, for example, by making a wrapped strip first. With an 00-size hole punch, make a small hole in either end of the breastcollar panel where you want the ends of the laced strip to be. These holes will be where you tuck the ends of the lace into for a nice finish, so plan them carefully.
- Shape the laced strip to the shape needed to cover the area, and make sure there is at least 1/2" extra length of leather on the strip.
- Stick about a 1/4" tail into one of the holes you made from the front of the item, then crimp the tail end under. The long part of the strip should not be toward the grain side of the item.
- Using super-glue, lightly glue the strip in place on the front side in just a few key spots to hold it. Do not glue the strip down solid. Tuck the other tail end through the remaining hole and crimp the tab down gently.
- Using a needle and thread (thread of the same color as the leather) use a looping stitch to sew the strip to the item. One stitch every two bights of silver lace should do it. This will keep the strip in place on an item that will be bent and shaped as it's used. You may omit the glue altogether if you prefer. Glue alone won't hold things in place when an item needs to be repeatedly flexed.
NOTE:
Any items that are laced that will have the lace come in direct contact with a model should be covered with a thin layer of leather on the back side to prevent scratching. Of note, those areas would be lower skirting and fenders on saddles, and edge lacing on breastcollars.
LACED BRIDLES AND HALTERS,
ETC.
The same procedure fro creating wrapped strips is used, except you'll need to glue the tail end of the leather around something such as a bit shank or buckle. Adjust the areas you lace around so that there will be enough leather left to make tabs from as needed for this purpose. Plan your project carefully before you begin so you can make the laced portions the right length.
Remember to keep longer tabs that will be passed through a buckle (such as a crown strap) free of lacing for the portion that will pass through the buckle.
****CAUTION****
These items can scratch the model. It is a good idea to glue a thin liner to the back of any laced strap item such as a headstall to keep them from scratching your models. Thin skiver works, but in a pinch, even a piece of fabric or a snipping of paper towel will suffice.
TARNISHING
Silver tarnishes easily. If the silver lacing you are about to use is tarnished, try running it through a polishing cloth (#HD20) three or four times before you begin to remove the tarnish. Other silver polishing compounds and solutions can work as well.
One way to slow tarnishing down once an item is completed is to give it a coating of your leather finish (such as Tandy's Super Sheen.) When you're done with the item, just brush some over the lacing. This will seal it without affecting the finish on the leather. If applied with care, clear nail polish added only onto the lace itself will serve the same purpose.
BASIC MEASUREMENTS:
Measure the total length of edging needed for a part that you wish to lace, and multiply that by 2 for a good approximate length of silver you will need. If the total length is to be divided into smaller sections for easier handling, add one inch to each section.
For wrapping, measure the leather longer than you need so it is easier to hold onto as you work. Measure the area that will be wrapped, and use 1.5 times that length of silver lace.
The following is a basic chart showing some recommended silver lace lengths for common pieces:
TRADITIONAL
SCALE |
|
CLASSIC
SCALE |
| Part | Lace Needed |
|
Part | Lace Needed |
| Lower Skirt—entire | 21" |
|
Lower Skirt—entire | 16" |
| Lower Skirt—rear section only | 15" |
|
Lower Skirt—rear section only | 10" |
| Upper Skirt | 12" |
|
Upper Skirt | 9" |
| Cantle | 7" |
|
Cantle | 6" |
| Breastcollar Edges | each side 8" |
|
Breastcollar Edges | each side 7" |
—Wrapping—
(measurements are for length of the wrapped portion needed) |
| Horn Rim Edge | 3/4" |
|
Horn Rim Edge | 3/4" |
| Shoulder Seams | each side 3/4" |
|
Shoulder Seams | each side 1/2" |
| Gullet | 2-1/4" |
|
Gullet | 1-3/4" |
| Outside stirrup edge | each stirrup 3" |
|
Outside stirrup edge | each stirrup 1-1/5" |
| Entire stirrup edge | each stirrup 6" |
|
Entire stirrup edge | each stirrup 3-3/4" |
Back to Reference Page

 To Reference Main Page