
Tutorial |
Clearing Silicone from a Resin Cast Model |
 To Reference Main Page
Silicone Mold Release is often used in the casting process of most resin-cast model horses (and other figurines). It is imperative that the silicone is as completely removed from the surface of the model as possible, for best adhesion of primers and paints. This tutorial outlines the most effective way to clear silicone from a model.
Many figurines cast of resin are made with a silicone-based mold-release sprayed into the mold cavity, to facilitate removal of the cured resin casting. This helps the model to come out of the mold with less warping, extends the mold life and helps reduce tearing of the mold.
Unfortunately, the silicone is seriously resistant to primers and paints, preventing them from effectively adhering to the resin surface. It has long been contended that scrubbing the model with Ajax, or a similar scrub, and/or wiping the surface down with alcohol would remove the silicone, and add some "tooth" to the surface for primer to adhere to.
However, I learned the hard way that this "fix" is not necessarily adequate, and did some research and a series of experiments to find out what really does work.
The primer (and everything on top of it – basecoating, oils, acrylics, detailing, pastels) are likely to literally "pop off" of some areas. You may not notice there is a problem unti the model is exposed to temperature extremes, or tips over and bangs against something. If you are lucky, the issue will appear while you are still prepping the model. Issues may not appear until the model is mostly completed, or even quite some time after the model is done.
Damage to an area not affected by silicone under it (particularly on a model painted in oils) may result in a scuff, ding or gouge, and may not even penetrate the paint entirely, or the primer. You can usually take some fine sandpaper, smooth the area (patch it if necessary) and repaint and the underlayers remain intact.
But, if there was silicone under or near the stressed area, an area will just crack and separate off, including the primer. If you attempt to carefully sand it, everything that is not adhered will continue to crack and pop away until you get to an area where things are well-adhered.
This tutorial will help you prevent this from happening in the first place. For tips to fix a model this has happened to, there is additional information at the bottom of this Tutorial.
It just means the silicone hasn't been completely removed. Depending on the exact mold-release used, and how heavily it was applied, it may take extra diligence to be sure it's removed. The primer can crack off anywhere, but it is mostly likely to occur in or around depressions, crevices and undercut areas, as they can be more difficult to clear.
Sadly, sometimes the nicest moldings can be affected the most. Simply because a very nice, clean, smooth casting often isn't sanded over all the surfaces as one that may need a lot more prep work. So it pays to be especially diligent with models that don't seem to need a lot of extra work.
You cannot readily see, or feel, silicone on the surface of a model, without a little help.
I tried several cleansers, including Ajax, Comet, Bon-Ami, Borax, and others, and Bar Keepers Friend worked the best... by a wide margin. The time required to "clear" or "strip" the silicone from the resin was more than twice as fast as any other easily-available abrasive cleanser.

You'll need to fill the spray bottle with water, and add several drops of food coloring.
Any old toothbrush will work, or other similar scrubbing tool that can get into nooks and crannies.
You can clear (or "strip") the silicone before or after basic seam removal. This step should be done BEFORE you use any filler (epoxy putty, spot filler, etc) as fillers will not adhere fully to the silicone any better than primer or paint.
Here we have a Veronka ready to go, over the sink.

Just for purposes of illustration, I've run water over the model, to show how the water is "beading up" over the body. You can kind of see that, but you can see the effect of the colored water much more clearly (see Step 4)
Everywhere the water "beads up" indicates the presence of silicone on the surface.
What you want to see is "sheeting", where the water forms a "sheet" across the surface and doesn't immediately break up into beads.

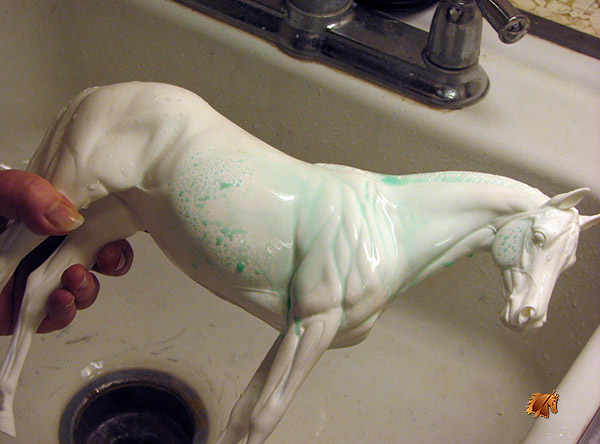
Spray the colored water onto the model. You don't have to spray the whole model, just a part of it to start.
When the water is first applied, it appears to "sheet", but as it drains away.... it also quickly forms into beads that stay on the surface.

After just a few seconds, what initially appeared to be a nice "sheet" of water over the surface, broke apart into obvious beads.
The colored water makes it obvious. It appears the entire neck and shoulder of this model is covered with a layer of silicone.
Add as much food coloring to the water as you need to, so you can easily see where the water is beading up.

Rinse off the colored water, then sprinkle a little Bar Keepers Friend (BKF) on the area.
It usually works best to work a limited area at a time.
You can also dump a little "pile" of BKF in the corner of your sink, and dip a wet toothbrush into that.

Wet the toothbrush a bit, and then start scrubbing with the BKF over the affected area. Add enough water to make a "paste" and scrub carefully. With BKF you don't necessarily need to scrub hard, but to fully scrub the entire area, make sure all portions get about 5-10 circular "strokes".
Pay particular attention to any areas that have wrinkles, grooves, depressions or undercuts, and scrub those a bit more.
A small, round, stiff "stencil" brush can work to get into places like nostrils and ears.

Rinse the BKF paste off the model thoroughly, then spray with your colored water again.
Everywhere the silicone was removed, the water should remain on the surface in a "sheet". It will mostly drain and drip off, rather than bead up.
Check every bit of the area, especially grooves, as the water drains off, looking for small or even miniscule areas that might appear to show some beading.
If you are not sure you are seeing the water bead up, go ahead and sprinkle on some more BKF and scrub those areas a little more and try again.

This is what the colored water will look like after most of the water has drained away. The area on the neck and shoulder has a sheet of water across it (and the water is a little "deeper" where it settled into the grooves). There is no beading
However, note on the horse's head, and on the barrel, the colored water is still beading up where the resin wasn't scrubbed.
Continue to scrub and test every area on the model, to be sure all of the silicone is cleared.
When you are sure all areas of the model have been cleared of silicone, rinse the model well, and set it aside to dry. If you wish, you can wipe off the model with a lint-free cloth.
Once the model has dried, you can proceed with any filling and patching or additional sanding.
While you could carefully sand/scuff the entire surface area with fine sandpaper and accomplish the same thing, if you've ever tried it, you know how difficult it can be to get into every nook and cranny.... without ultimately sanding off some detail you don't want to. It also takes a LOT longer.
I tried all types of household cleansers, and Bar Keepers Friend works the best and quickest. You can "make do" with others, such as Bon Ami, but it will take about 3-5 times more scrubbing to accomplish the same. I believe the BKF has a harder scrubbing particle that most other cleansers (and you may not want to use it on a high-quality sink!)
Ajax and Comet contain bleach and other cleaning agents, which may take longer to carefully rinse off the model and not leave a residue that can also affect how well primer will stick. Using these cleansers will also take 3-5 times longer than BKF.
Some people have advised using alcohol or even acetone to rub down the model and "strip" off the silicone. However, experts in the field (from firms that paint aircraft to auto manufacturers) contend that there isn't any solvent that is safe enough (or available) to use at home that will remove silicone. I did try every solvent I had available, and none had any effect on the silicone – the water still beaded up. I tried alcohol, acetone, ammonia, paint thinner, naphtha and various household cleaners.
I also learned that high-powered professionals have special testing methods and instruments to verify the presence (or lack of) silicone on surfaces. However, in layman's terms, the "water-sheeting test" is nearly as effective and costs next to nothing by comparison to the cost of special testing technology. It is most certainly effective for art pieces, compared to equipment that may be mission-critical.
In my opinion, it would seem to be best to go ahead and knock off the main seams and smooth them first. Sometimes depressions along seam lines can be sanded off, which means there won't be silicone hiding in a small groove that might resist allowing spot putty to adhere to fill it.
If you do have a low spot along a seam where you really shouldn't sand it all the way out (and it will need patching) try to get the edge of some sandpaper in there to lightly scuff out as much silicone that might be hiding in there.
Removing the "flash" or excess material around the seams ahead of time will make it easier to see the sheeting across all areas, and ensure that the flash isn't covering up an undercut that's holding silicone.
Manes and tails can be particularly tricky to work around, because they often have sharp ridges that make it hard to tell if the water is beading up, or merely settling in the low spots. Just give these areas extra scrubbing attention, especially where there may be deep or narrow grooves, or undercuts.
You may find that adding a small "stencil brush" with stiff bristles (about 1/4" diameter or so) can help to more effectively get into ears, nostrils, wrinkles, and deeper nooks and crannies that a toothbrush can't quite reach. Of course, you may find you prefer stencil brushes (perhaps in several sizes) to a toothbrush. It doesn't really matter what kind of brush that you use...whatever gets the job done to your satisfaction.
Some models are harder than others to clear. I have not determined if it's a particular brand or type of mold release at times, or if more of it just settled into some areas, but there can be a wide range of how much time it will take to clear a model of silicone. On average it takes about 10 minutes, but can be as long as 30 minutes or so, if there are a lot of undercuts, hard to get to areas, or the coating is thick or just more resistant than usual to letting go.
A model that you suspect might be affected by silicone under the primer often presents itself initially as a raised area (often after priming, basecoating or even painting) that wasn't there before. You were sure it was smooth, and yet there's this odd minor bump....
If you try to sand it down, or otherwise mess with it to level it out, if this is the issue, it usually doesn't take much and the spot just pops off. This can also happen with some resin casts where there's an issue with the underlying resin (bad mix or pour) as well as areas that have miniscule pinholes hiding that were covered up (or possibly patched) but enough airholes remain that expand and push the primer outward.
In any of these cases, the area really needs to be fixed, and it's not necessarily the most fun thing to do.
Admittedly, this is a most un-fun task to undertake. The truth is, if there is a problem area, it is going to flake off on its own, sooner or later. It is best to fix such issues as early in the process as possible.
If you've actually read down this far, pat yourself on the back! Knowledge is power, and now you not only know what to do, but also, why.