
|
Using Glue Squares
|
 To Tacky Wax/Glue Squares Page
Easily attach bit shanks to a model using Glue Dots® Glue Squares.
We have tested these glue squares by leaving them on various types of models and objects for months at a time, with no ill effects on properly sealed paint jobs. However, if you are not certain, or concerned they might cause a problem, be sure to remove them as soon as you are done showing, displaying or photoing the model.
If you are not certain, please perform your own tests in an inconspicuous area of the model, or on a "beater" model with little value.
Please DO NOT use this adhesive on unsealed (not thoroughly clear-coated) acrylic paint, or other unsealed art work.


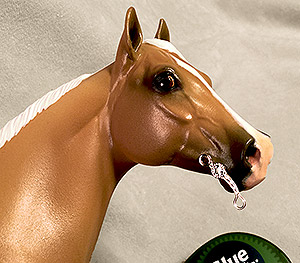
The removable glue square can be left on the back of your bits, and the same dot can be used until it gets "dirty" enough and stops sticking. When it does, just pick it off, and apply a fresh glue square and you're good to go.
The more you handle the glue square with your fingers, the less it will stick (due to oils and substances on your finger tips). Get a fresh square rather than fight with a "dirty" one that isn't working as expected.
This adhesive can be removed from metal objects (bits, tweezers, scissors, hobby knives , etc.) using a little mineral spirits, turpentine or paint thinner on a cotton swab.
If you need to adjust the bit, lift it off and re-set it. If you try to twist or shift it into place, it will just return to the original way you set it.
Large or heavy bits might need 2 or 3 glue dots for a secure hold.
There may be bits in which affixing the glue dot to the horse first, then applying the bit to the glue works better.
Glue squares can be cut with a scissors, or hobby knife, to make them smaller for small-scale items... however this can be tricky (and might be difficult). Expect to do a little practice to find a technique that works for you if you need smaller amounts of adhesive, or are working with very small scale items.
A toothpick sometimes can help to accurately apply a small amount of adhesive.
The adhesive can be melted with gentle heat and applied with the tip of a tweezers or toothpick.
Glue squares can also be used to affix reins into dolls' hands, it can tack down "fly-away" straps or straps that don't want to lie properly, it can be used for straps on boots instead of buckles (to simulate a velcro-type fastening). There are many potential uses!
Glue squares should not be used on suede, as they can be very difficult to remove from fibrous materials. They should not be used with hair (like mohair). However, they are great to attach temporary ribbons, or optional braids, temporary decorations etc.
Be mindful about disposing of used glue squares... they can end up places you'd rather they didn't! (Especially in hair, or haired models!) They will stick to each other...so you can pile them up and make a disgusting glue dot booger with them, but at least it will be large enough to find when it's time to clean up and throw it away!