
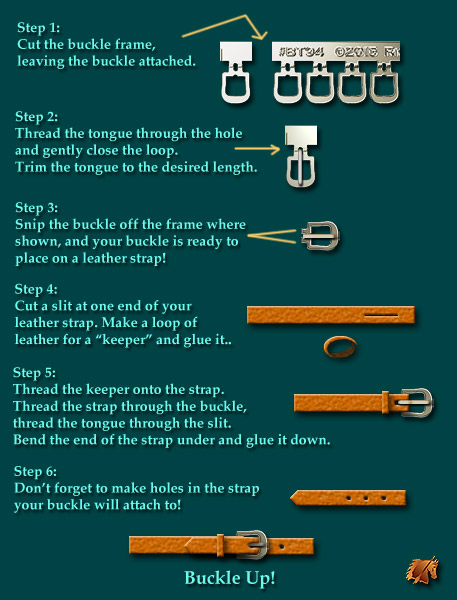
Tutorial |
Leather Buckle Strap Keepers |
 To Tutorials Main Page
Learn how to make buckle strap keepers from leather, that can be used plain, or decorated with Keeper Tops.
This tutorial will show how to make a stationary leather keeper that doesn't move or slide out of position, which is a good choice for decorated buckles and keepers.
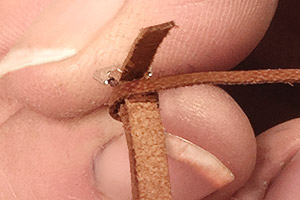
Set up the Buckle Top and Tongue as shown
or review this tutorial for some how-to information.
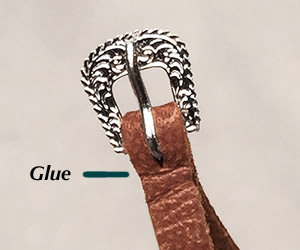
Put a little glue between the layers of leather in the location shown in the picture.
You just want enough glue to tack the strap and tab together just under the buckle top, so it will stay in place.
The leather tab should be free, and not glued down below that.
Take a piece of leather lace in the width you want, and skive it thin. To skive, you can shave a thin layer from the back side of the strap with a hobby knife, or use sandpaper to thin it down from the back (flesh) side.
The strap should be about 2" long.
If you will be making a number of strap keepers, it will be handy to prepare a longer piece, or several shorter ones with the skiving before you begin any further assembly.
Keepers can be made from pieces as short as 1" (scraps or leftovers, if you have them).
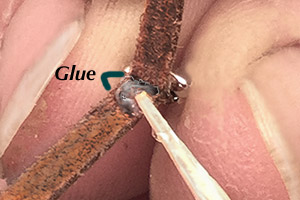
Turn the buckle strap over so the decorated side faces down, lift the "tab", and apply a little glue to the buckle strap just below where the buckle was glued in place.
Try to get the glue as close to the buckle as possible without undoing all of the glue securing the buckle itself.
Place the keeper on the back side of the buckle strap (not the "tab" side) with the grain face-up. (The deco on the buckle should be face-down.)

Turn the entire buckle assembly over and it should look like this.
Allow the glue to set or dry a few moments.

You'll need an extra piece of strap for this, a "dummy strap" if you will, that is the width and thickness of the strap you'll use to fasten the buckle (the strap that will have holes).
You can use your actual "hole strap", but you may risk getting glue on it where you don't want it, so it is best to use a similar-sized "dummy" strap here.
If you use a dummy strap that is thicker than the actual strap you will be using, the keeper may end up loose or sloppy. If you use a strap too thin, the actual hole strap may not fit through.
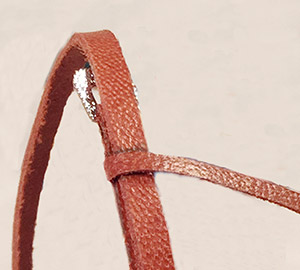
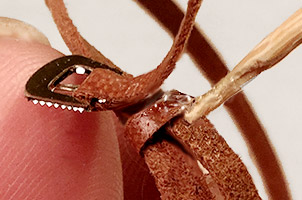
Wrap the keeper strap around, and pass it between the buckle strap and it's "tab". It should overlap the area where you glued the end down.
The "tabs" may overlap (as shown in the picture).
Turn the assembly over, and line up the straps (the buckle strap, and the hole strap) so they are stacked neatly atop one another.
Pull the keeper strap to "snug" it up across the back side, under the tab.
At this point, it may be helpful to use a pair of Hemostats to hold the buckle and dummy straps together and aligned while you apply the glue. This step can be tricky if you don't have such a tool, but it can be done.
Apply some glue with a toothpick (to limit the amount of glue) to top of the keeper end you previously glued down.
Wrap the keeper strap around and get it slightly snug, then press it down on the glue. Let the glue dry or set a moment or two, then trim off the excess keeper strap that sticks out from the side.
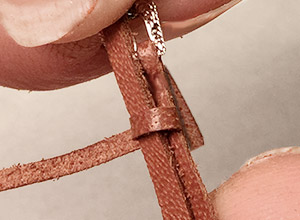
Now, you can glue the tab down to the underside of the buckle strap, securing the keeper in place.
Turn your buckle assembly over, and it should look like the picture.
If you are using plain heel-bar buckles, your work is done!
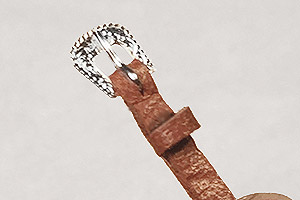
Decorated buckles usually have matching decorated Keepers or Keeper Tops.
If you have a keeper with "wings" that stick out to either side, trim the wings off, and smooth off the cut edges with sandpaper or a small needle file.
Keeper Tops should be affixed with a good super-glue. You may find a super-glue gel works best as it will give you a little time to get the Keeper Top properly aligned.
Apply a small amount of super glue (with a toothpick) to the top of the leather keeper.
Using tweezers (or needle-nose pliers) pick up the Keeper Top, and place it carefully on the glue.
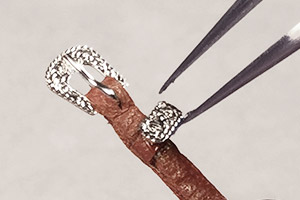
Adjust the position of the keeper top as necessary to get it all lined up nicely.
It is best if you allow the glue to set several hours or overnight before doing anything with the buckle so it will have a chance to fully adhere.
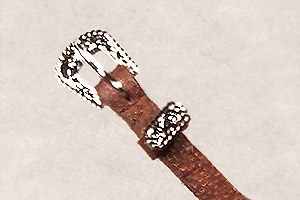
This is what your finished buckle and keeper should look like when you're done.