
Tutorial |
Metal Buckle Strap Keepers |
 To Tutorials Main Page
Make metal buckle keepers for heel-bar buckles using the "frame" scraps from etching sheets. These can be used plain, or you can add a decorative Keeper Top.
Sometimes, the metal keepers with "wings" don't work, and the wings break off. While this can be disappointing, there actually a solution that works as well or better, and more consistently. This tutorial will show you how to never have to worry about the keepers again.
All those frames and edges of sheets you've been cutting off can be used to make metal buckle keepers (and, a few other items!)
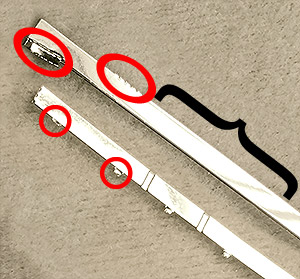
You want to select a section of frame that will be easiest to work with.
The red-circled areas are parts of frames you should avoid, if you can. They include irregular cut ends, machine marks, and leftover connecting tabs (or "nubs). While you can use a piece of frame that has these issues, you will need to sand or file off any protrusions, and smooth and level things off.
Using a portion of the frame shown in the bracketed area will be easiest.
Frame parts also come in different widths, so select a frame part of the width you want the finished keeper to be.
If you are going to be adding a decorative Keeper Top, make sure the frame piece you select is not wider than the keeper is, for best results.
Start with a strip at least an inch long, if possible, as it will be easier to work with.
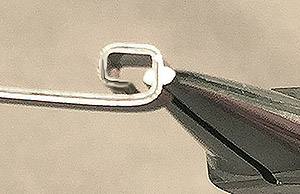
Bend the keeper in a shape more or less as shown. The first bend should be half the width you'll want the finished keeper to be, so that the "seam" created between the edges will be hidden under the leather straps.
The fourth bend will be tricky because you actually want to bend it so that it is the same depth as the opposite side. If you can get it close, that should be sufficient.
If there is lettering on the frame strip, make your bends towards the lettering, so they end up on the inside of the keeper. The metal bends easier that way as well.
You can try to cut a piece of frame just the "right length" so that the edges match when all the bends are made, but that last bend can be extremely difficult to accomplish without a lot of practice, and probably a second pair of pliers.
Small keepers for 1/16" straps can be impossible to bend properly where the edges come together in the middle of the bottom side.
Small keepers like this should be bent so that the edges come together at one corner.
Once the extra frame is cut off, you may want to sand or file the corner to smooth it so it is less likely to scratch a model.
You can bend larger keepers so that the ends meet at the corners... you just end up with a bit more work to smooth the corner where the edges meet. It may be that you are able to form more consistent and even keepers using this type of bend.
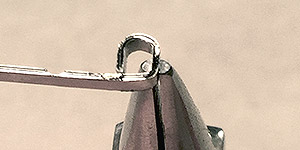
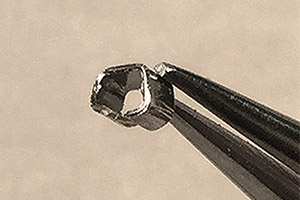
With a good pair of cutters, cut off the extra metal frame so your keeper ends up looking like the picture. If you cut it a little short, it will work fine, the edges do not need to perfectly match.
With a pair of needle-nose pliers, "flatten" the bottom of the keeper so that the cut ends come together.
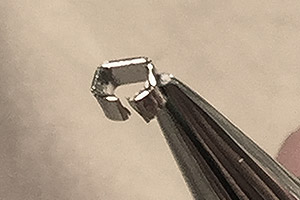
Take a moment if needed to "even up" the keeper if it is a little off, or twisted.
If you are really obsessive, you can file the "join" area to make it smoother, or thinner.
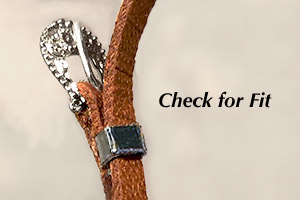
Slip your keeper onto your buckle strap, so that it is between the "tab" from the buckle and the buckle strap.
Get the strap that you'll be using to (the one that will have the holes) and check to see that it fits in the keeper. This "hole strap" should slide through the keeper easily, without being too loose and sloppy, or too tight (which will make it difficult to fasten later).
Adjust the keeper as necessary so you get the fit you prefer. If your keeper is way off, you can set it aside for another project and make another one.
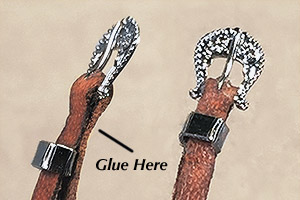
Apply a little glue (with a toothpick) to the area shown in the picture, to secure the Buckle Top in place. Allow the glue to dry or set a few moments.
Slide the keeper into place, then glue the remainder of the tab down over it.
If you are making a plain keeper, your work here is done!
Use a good super-glue to attach a decorated Keeper Top.
If you have a Keeper Top that has "wings" to either side, trim them off. Sand or file off any cut edges from your keeper.
A gel-type super glue is best, and we recommend "Aleene's Jewelry & Metal Glue", although there are many other options available. A gel-type super glue will allow you a little time to get the keeper lined up nicely.
Apply a small amount of the glue to the top of the keeper keeper.
Using a tweezers or fine needle-nose pliers, apply the Keeper Top, and carefully align it. Lightly press it down with tweezers (or a toothpick) to help it set in place.
Allow the glue to set for several hours, or overnight, so you don't risk having it pop off.
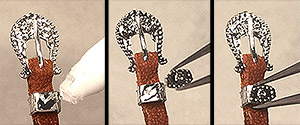

If you don't have a fine pair of tweezers, you can put a little sticky wax on the tip of a toothpick and use that to pick up the Keeper Top, and set it into place.
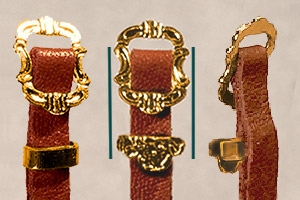
Your buckle and keeper are done!

Iberico Buckles are constructed differently from standard plain or decorated western-style buckle sets.
Iberico buckles are center-bar style buckles, with a keeper.
The Keeper Tops are about as wide as the buckle, rather than being just wide enough to cover the strap, as with western-style buckles.
We have produced keepers with and without "wings", however if you use the Keepers with wings, the keeper portion itself will be wider than it should be... resulting in a loose and sloppy fit.
The Iberico Keepers without wings (Tops only) need to be set on either a leather or metal keeper, however, this will allow you to have a keeper that will fit the buckling strap nicely, and maintain the proper look of having the Keeper Top be the proper width to match the buckle.
When assembling a keeper for this style of buckle, the Keeper Top will be wider and "stick out" from the keeper itself.
If you have Iberico Keepers with the "wings", you can just snip them off and use just the Tops.
Iberico Buckles for model horses can be assembled with or without buckle tongues.