One Ear Plates for Bridles
These specially designed ear plates are made to conform to the ear area with just a little careful bending. They'll fit around most ears (where there is not a lot of sculpted forelock or mane) without sticking out away from the model.
These plates can be used in three ways:
- Glue the ends directly onto the crown in the desired location. (A quality super-glue is recommended)
- Glue the plate to some leather lace/strap material and then attach the lace to the crown strap, either directly or by forming little "loops" of strap on the ends, so that the Ear Plate will slide.
- Glue loops of strap on the ends of the plate, then thread the crown strap through the loops.
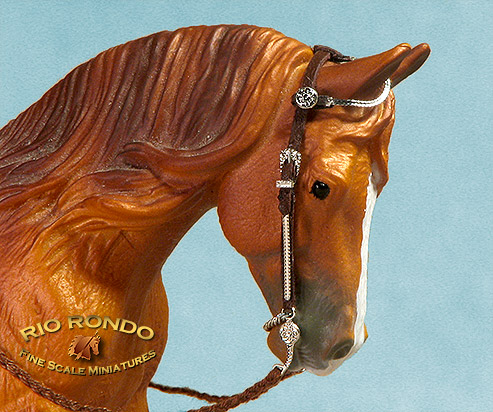
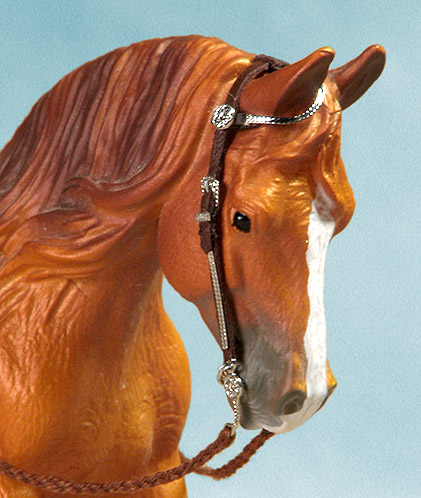
Here's what was used to create the bridle shown in the pictures:
-
Headstall Straps: 1/16" Leather Lace in Brandy Color - LL116y
-
Cheek Strap Deco: "Reno" Deco Rails - RA595s
-
Buckles: "Reno" Deco Buckles, Large - JX945s
-
Bit & Concho: "Prairie Rose" Bijoux Bit - JX974s
-
Chin Strap: Fine Chain - HD9s
-
Affixing the Bit: Removable Glue Squares - GL236
-
Reins: Embroidery Thread to match, braided.
-
Other Items:
- Scissors
- Hobby Knife — TL101 or TL102
- Xuron Cutters — TL723
- Needle Nose Pliers — TL721
- Curved Tweezers — TL788
- Bead Pick/Awl — TL843
- Duro brand Super-Glue
- Small Piece of 320grit Wet-or-Dry Sandpaper
- Super fine beading wire
- Toothpick, as well as a spare piece of etching "frame", to dab the glue on

Here's a "Walk Through" of how this bridle was assembled:
- Hardware Prep–
The bit shanks and buckles were cut from their frames, the "nubs" closely snipped off with the cutters. Sharp edges smoothed with sandpaper.
- Lace Skiving–
The leather lace was skived (thinned) from the back side with the Hobby Knife. I only did a few inches to get started with. The remainder was skived as I went.
- Tiny Buckle Tongue–
this was made from fine beading wire and affixed to the buckle top.
- Buckle Strap–
A slit was cut lengthwise down the center of a lace strap, about 1/2" from one end. (The strap was about 2" long to allow for room to work. the slit was bout 1/8" long.)
- Put the Buckle on the Strap– This is tricky at a small scale, especially when using a tongue. (This type of bridle can be made without a buckle tongue).
One end of the strap was cut to a skinny taper so it would get started through the buckle easier. The strap was pulled through enough so that the tongue could be pushed through the slit from the bottom with a fingernail. Folded the extra "tab" under the buckle top and glued it down.
- Set up the Cheek Strap–
I "eyeballed" the length between the bit and the buckle. I used a little glue dot to hold the bit shank in place to visualize things better. Using a fingernail, I "dented" the strap where I wanted to bend the tab end to fit onto the bit.
Leaving plenty of extra tab length, the end was cut to a taper so it would thread through the headstall loop of the bit, passed the leather through, folded the tab down and glued it where I thought the length looked best. Snipped the excess tab with cutters.
Made a matching cheek strap for the other side.
- Chin Chain–
Threaded a 2" long piece of wire through one end of a piece of chain (about 1" of chain), then threaded the wire through the headstall loop of the bit, underneath the cheek strap.
Looped the wire around and back through the same spot on the bit, then carefully pulled the loop around slightly snug, making sure the ends of the wire loop overlapped (the beading wire is not strong enough to hold like a "jump ring").
Snipped the ends of the wire off and made sure they were pushed in so no sharp edges remained.
Eyeball-measured how long the chin chain should be, and trimmed it with cutters. Then used another piece of wire to wrap around and affix it to the other bit strap (being careful that there was not a half-twist in the chain).
- Added Deco Rails to the Cheek Straps–
Eye-ball measured the length and cut two matching pieces. Sanded the back side of each piece so glue would have more to grip.
Squeezed out a little super-glue onto an index card, then picked up one end of a rail strip with tweezers. Dipped the back side of one end to the glue, then carefully placed the end on the strap, near the bit.
With a little super-glue on the end of a toothpick, I dabbed that onto the leather and then aligned the rest of the plate to be as centered and straight as possible. Repeated for the other side.
- Crown Strap–
Skived 2 pieces of lace about 3-4" long
This bridle will attach around the crown area, using sticky wax between the two crown pieces (overlapping), rather than actually buckle.
Poked about 3 holes about 1/2" from the end of one strap and carefully reamed the middle hole from the back side so that the buckle tongue could find it. The tip of the strap was cut to a skinny taper, to more easily thread through the buckle top.
When the strap was through, I pushed the tongue through the hole, and snugged up the buckle. Using a little super-glue on a bit of "etching frame", I touched some to the leather on the cheek strap just below the buckle top and tacked part of the crown strap down, making sure everything was in-line. Deliberately leaving extra length below the buckle to be trimmed to suit.
Using the cutters (since they are fine, sharp and tend to be more accurate than my scissors) I cut the end of the crown strap below the buckle into a taper.
Glued the tip of the strap down . . . it covered one end of the deco rail a bit. (I did not make any keepers for this).
Dabbed a wee bit of glue under the top end of the buckle, and glued that down to the crown strap, making sure everything was aligned.
Repeated it all for the other side.
If only one buckle was to be used, it should be on the left side of the bridle, with no buckle on the right)
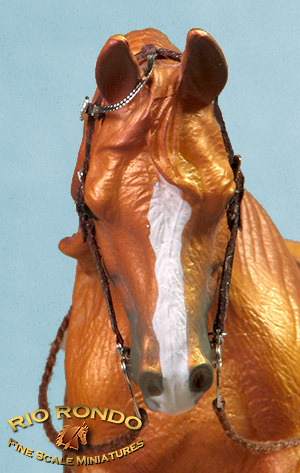
- Set Up the Ear Plate–
I skived a length of lace, and cut two pieces about 1/2" long. Folded those in half to check for length for each to make a loop that would go around the crown strap. (To be attached to the ends of the Ear Plate.)
Sanded the underside of the very ends of the ear plate so the glue would stick better.
With the plate upside down, I put a little glue on the "flesh" side of one leather strip, and placed it on one end of the Ear Plate, about 3/32" from the end. I glued a strip to the other end as well.
I used the full length of the decorated portion of the earplate, but no extra--you can get a little more length for the plate if needed by leaving the end tabs on, and gluing to that area instead. For smaller models, trim the ends of the Ear Plate as needed for proper length.
I allowed the glue to dry an hour, before continuing, to make sure it "stuck".
- Ear Plate Loops–
Folded each leather strap over a spare piece of skived strap to check for length... as I wanted this earpiece to slide.
Added a touch of super glue to the flesh side of one of the loop straps, and folded it over so it affixed to the top of the plate. Repeated for the other side, and took a break to let the glue dry.
Using a sharp Hobby Knife, I trimmed away some leather so that the loops would be even, and not bulky.
Slid the ear loops onto a scrap of strap, and fitted it over the model's ear. Gently formed the "curve" of the ear plate to fit the model and snugged up the strap to eyeball how things would look.
If the loops don't allow the crown strap (or "dummy" strap in this case) to fit well behind/below the ear, the bridle will end up having the buckle wanting to be too close to the eye. This is a good time to peel off (or shave off with the knife) the loops and try again, if it turns out they are too short.
When I was satisfied with the shape of the ear plate, I took it off the "dummy" strap, and put it on the right-side crown strap instead, and adjusted its position on the strap to fit the model.
If I were to make a "two ear bridle", I would set up a second ear plate with loops, and attach that to the left-side crown strap.
- Making the Reins–
Actually, I made the reins while the glue on the loops was drying. I took a 15" length of embroidery floss that matched the leather color, and split the 6 strands into 3 plaits of 2 strands each. Tied a knot in one end, and braided as much of it as I could stand, and tied a knot in the other end.
A dab of glue was placed on the braid right behind each knot (when that was dry, I cut off the knot, and the glue "secured" the ends. The glued area was about 3/32".
A long narrow taper was cut into the glued section on one end (when the glue was dry). This made for a fine tip to thread through the rein loop of a bit shank.
I folded a tab under and used super-glue to tack it down to affix one end of the braided rein.
Eyeballing approximate length, I made a knot in the braid where I wanted the rein to end, and then made another knot about 1/2" beyond that. The braid was cut in the middle, and the ends frayed into a "tassel".
The other rein was then attached to the other bit shank... the length checked to match the first one, and a knot tied in place, and the ends trimmed and frayed to match.
Embroidery thread was used here because it is easier to get to drape nicely than leather.
- Added the Keeper Tops–
Two short pieces were cut from the side-rails of the little buckle sheet. A dab of glue was applied to the top strap (crown strap) about where a keeper would be, if there was one. Using tweezers, the keeper was carefully placed to line up nicely on one side, and then the other.
Initially I tried to make proper keepers when I set up the buckle, but they were bulky, so I tried again without.
- Added a Concho–
The back side of the other bit that came with the set was sanded to provide more tooth for the glue.
The center "concho" portion was cut apart from the shank and the sharp edges sanded smooth. A dab of super-glue was placed on the lower loop of the Ear Plate, and tweezers used to place the concho.
The assembly was left to sit and dry awhile at this point
- Put it all Together–
Slit a glue square in half and applied each half in a little "ball" onto the mouth corners. Set the bit shanks into position by pressing them on, and made sure the chain was not twisted. Slipped the ear plate over the ear and slid it into position.
At this point, I was left with two extra-long crown straps (one from each side). I decided how much they would overlap and trimmed each side back. I rubbed some sticky wax on the top of one crown strap and the bottom of the other. Then I pressed them down together near the model's poll.
The reins were lined up and arranged, and then I took pictures.


 To Bijoux Headstall Page